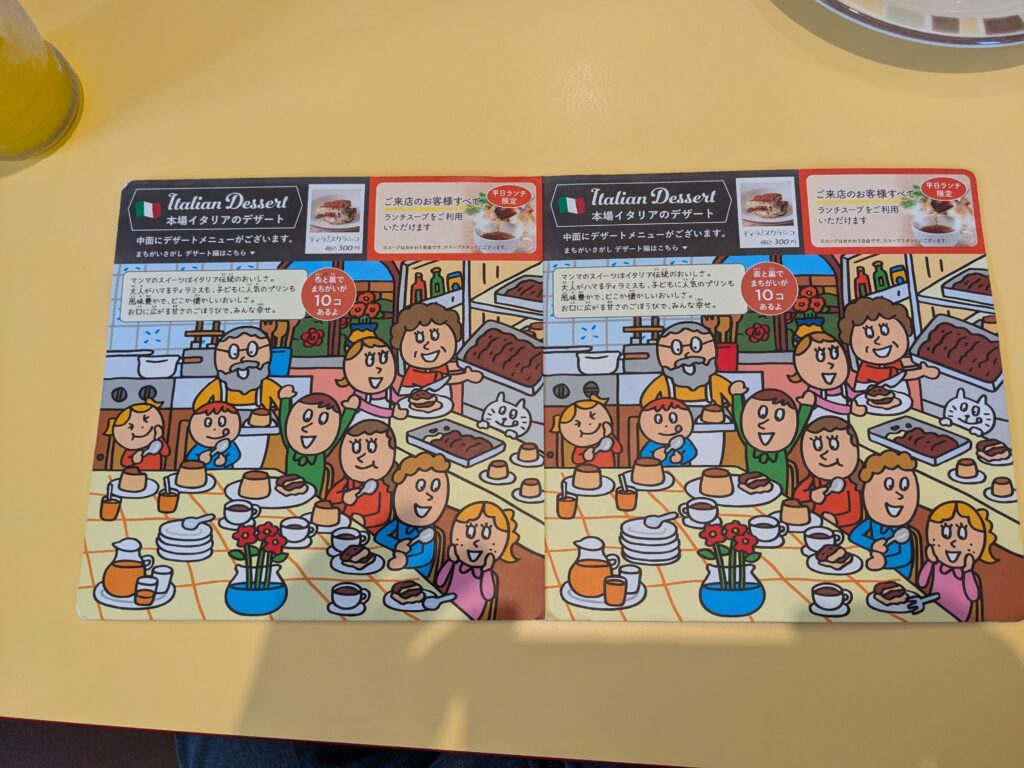
サイゼリヤとても利用しています。おいしくて安くて良いですよね。サイゼリヤの子供用メニューの裏側にはとても難解で有名な間違い探しが出題されています。とても難しいので、これを自動で解くアプリを作りました。
しかし、完成度や収益化に問題があるため、ここで公開するにとどめます。本当はGithubに公開するのが良いのでしょうね。
まず、サイゼリヤに行きます。料理を注文します。待ち時間が多少あるので、間違い探し問題のを見つけ、撮影します。影が多少はいりますが、なるべくはいらないようになるべく真上からとりましょう。
アプリ起動後、これを撮影します。右のボタンで撮影します。黄色いガイドラインを参考にしてください。
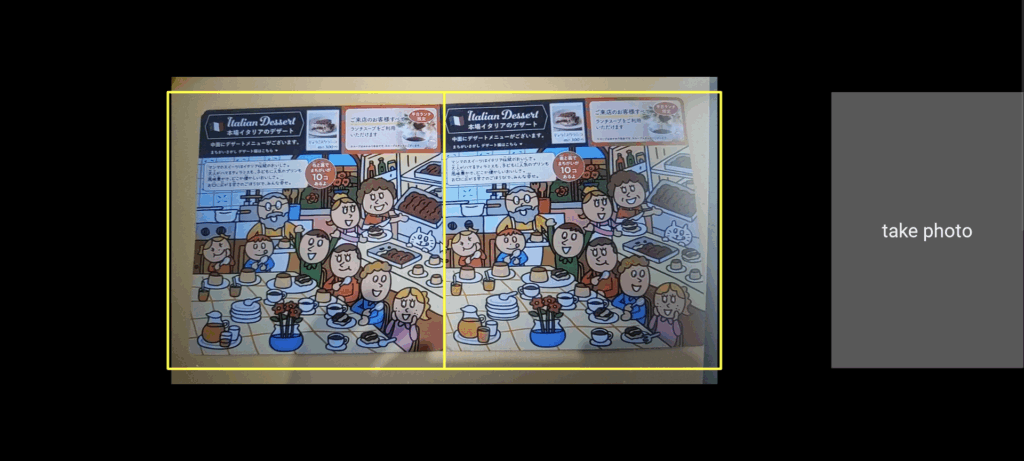
画面下部に、ラフな分析結果が表示されます。
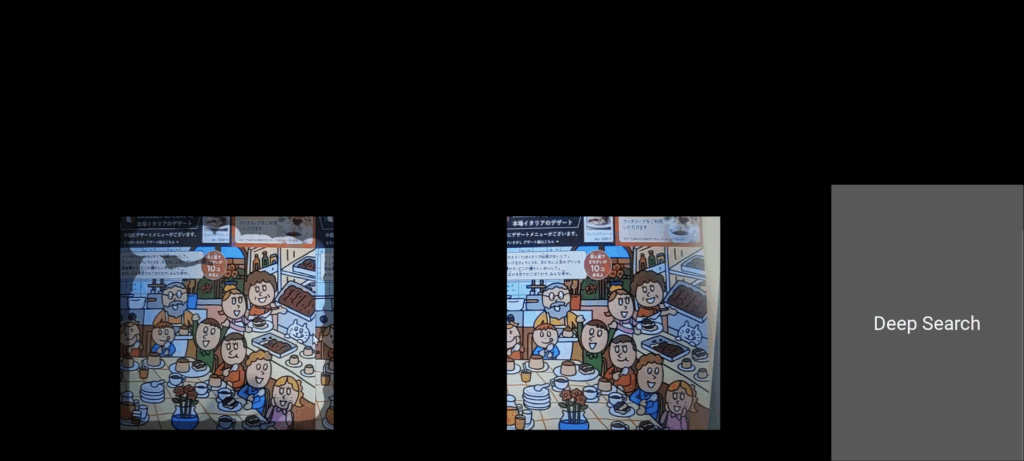
右のボタンを押すと詳細な比較分析を実施します。結果は拡大表示されます。白抜き表示される部分は誤差がありそうです。
認識精度は標準でStandardですので、誤認識の割合にあわせて下部ボタンを押して認識閾値を変えてください。

アプリ本体はここに置いておきます。APKって何?っていう人は使用しないでください。ご要望が多ければPlayStoreで公開検討します。
アプリ概略:Android 用アプリ。Python+kivy+Opencvで開発。Windowsでも稼働。パーミッションリクエスト出さないので手動で設定必要。
以下スクリプト載せておきます。詳細は省きます。
Buildozer.spec
[app]

# アプリの基本情報
title = Diffpic
package.name = diffpic
package.domain = com.sample
source.dir = .
source.include_exts = py,png,jpg,kv,atlas
version = 0.1

# エントリポイント(main.pyを使う前提)
entrypoint = main.py
icon.filename = %(source.dir)s/icon.png
presplash.filename = %(source.dir)s/data/presplash.png
android.presplash_color = #FFFFFF

# 必要なPythonモジュール
requirements = python3,kivy,opencv,numpy

# アプリの画面向き
orientation = landscape
fullscreen = 1

# Android 関連設定
android.permissions = READ_EXTERNAL_STORAGE, WRITE_EXTERNAL_STORAGE, CAMERA
android.api = 31
android.minapi = 21
android.ndk = 25b

# Buildozerが自動的にNDKのパスを取得する場合は以下の行は不要
# android.ndk_path = /your/path/to/android-ndk-r25b

android.archs = arm64-v8a
android.hardware = camera
android.allow_backup = 1
android.extra_args = --copy-libs

# ログとデバッグ
log_level = 2
log_filename = myapp.log
android.encrypt = 0
main.py
from kivy.app import App
from kivy.uix.boxlayout import BoxLayout
from kivy.uix.button import Button
from kivy.uix.image import Image
from kivy.uix.scrollview import ScrollView
from kivy.core.window import Window
from kivy.utils import platform
from kivy.uix.camera import Camera
from kivy.graphics import PushMatrix, PopMatrix, Rotate, Color, Line
from kivy.uix.floatlayout import FloatLayout
from kivy.uix.scatter import Scatter
import cv2
import numpy as np
import os
from kivy.uix.popup import Popup
from kivy.uix.label import Label
from kivy.uix.togglebutton import ToggleButton
class CameraOverlay(FloatLayout):
def __init__(self, **kwargs):
super(CameraOverlay, self).__init__(**kwargs)
self.bind(size=self._update_rect, pos=self._update_rect)
def _update_rect(self, instance, value):
self.canvas.after.clear()
with self.canvas.after:
Color(1, 1, 0, 1) # 黄色
# 1000x500の長方形を中央に配置
w,h = self.size
dw,dh = w*0.2,h*0.2
Line(rectangle=(max(0,w/2-dh*3), h+dh, dh*6, dh*3), width=3)
Line(rectangle=(max(0,w/2-dh*3), h+dh, dh*3, dh*3), width=3)
class CameraApp(App):
def __init__(self, **kwargs):
super(CameraApp, self).__init__(**kwargs)
self.left_img = None
self.right_img = None
def log_message(self,tag, message):
"""メッセージを出力する関数"""
print(f"[{tag}] {message}")
def get_temp_dir(self):
if platform == 'android':
try:
from android.storage import primary_external_storage_path
return os.path.join(primary_external_storage_path(), 'Pictures')
except ImportError:
pass
# Windows環境用のパス処理
temp_dir = os.path.join(os.path.expanduser('~'), 'Pictures', 'ImageDiff')
os.makedirs(temp_dir, exist_ok=True)
return temp_dir
def detect_and_crop_rectangles(self, image):
try:
# 画像を1280x720にリサイズ
image = cv2.resize(image, (1280, 720))
# 画像の中心1280x550を切り出し
h, w = image.shape[:2]
center_x = w // 2
center_y = h // 2
cropped = image[center_y-275:center_y+275, center_x-640:center_x+640]
# グレースケール変換
gray = cv2.cvtColor(cropped, cv2.COLOR_BGR2GRAY)
# 画像を出力
temp_dir = self.get_temp_dir()
os.makedirs(temp_dir, exist_ok=True)
#temp_path = os.path.join(temp_dir, 'gray.png')
#cv2.imwrite(temp_path, gray)
thresh_value = 127 #背景を黒飛ばしする
ret, gray_thresholded = cv2.threshold(gray, thresh_value, 255, cv2.THRESH_TOZERO)
# ノイズ除去
gray = cv2.GaussianBlur(gray_thresholded, (5, 5), 0)
# 画像を出力
#temp_path = os.path.join(temp_dir, 'gray_blur.png')
#cv2.imwrite(temp_path, gray)
# 2値化する
_, binary = cv2.threshold(gray, 127, 255, cv2.THRESH_BINARY)
#黒の膨張と縮小をして白いノイズを除去する
kernel = np.ones((5,5), np.uint8)
binary = cv2.dilate(binary, kernel, iterations=1)
binary = cv2.erode(binary, kernel, iterations=1)
# 輪郭を検出する
#contours, _ = cv2.findContours(binary, cv2.RETR_EXTERNAL, cv2.CHAIN_APPROX_SIMPLE)
contours, _ = cv2.findContours(binary, cv2.RETR_LIST, cv2.CHAIN_APPROX_SIMPLE)
if not contours:
self.log_message("ImageDiff", "枠線検出エラー: 輪郭が見つかりません")
popup = Popup(title='ERROR',
content=Label(text='Detect window failed'),
size_hint=(None, None), size=(400, 200))
popup.open()
return None
# 輪郭をソートする
contours = sorted(contours, key=lambda x: cv2.boundingRect(x)[0])
# 1番大きい輪郭を除外
contours = contours[1:]
# 輪郭画像を黒背景に描画(カラー画像として作成)
contours_img = np.zeros((binary.shape[0], binary.shape[1], 3), dtype=np.uint8)
cv2.drawContours(contours_img, contours, -1, (255, 255, 255), 2)
# 輪郭点の座標を取得
points = []
for contour in contours:
for point in contour:
points.append(point[0])
points = np.array(points)
# 水平な2本の直線を定義(上下の境界)
y_min = np.min(points[:, 1]) # 最上点
y_max = np.max(points[:, 1]) # 最下点
# 略垂直な2本の直線を定義(左右の境界)
# 左側の直線:x座標が小さい方から2%の点を使用
left_points = points[points[:, 0] <= np.percentile(points[:, 0], 2)]
# 右側の直線:x座標が大きい方から2%の点を使用
right_points = points[points[:, 0] >= np.percentile(points[:, 0], 98)]
# 左右の直線の上下端を決定
left_top = np.array([np.min(left_points[:, 0]), y_min])
left_bottom = np.array([np.min(left_points[:, 0]), y_max])
right_top = np.array([np.max(right_points[:, 0]), y_min])
right_bottom = np.array([np.max(right_points[:, 0]), y_max])
# 台形の4点を配列に格納
src_points = np.float32([left_top, right_top, right_bottom, left_bottom])
# デバッグ用:台形の可視化をcontours_imgに描画(赤色で描画)
cv2.polylines(contours_img, [src_points.astype(np.int32)], True, (0, 0, 255), 2)
# デバッグ用:すべての点を描画(青色で描画)
for point in points:
cv2.circle(contours_img, (int(point[0]), int(point[1])), 1, (255, 0, 0), -1)
temp_path = os.path.join(temp_dir, 'trapezoid.png')
cv2.imwrite(temp_path, contours_img)
# 変換後の長方形の4点を定義
dst_points = np.float32([[0, 0], [1000, 0], [1000, 500], [0, 500]])
# 透視変換行列を計算
M = cv2.getPerspectiveTransform(src_points, dst_points)
# 透視変換を適用
cropped = cv2.warpPerspective(cropped, M, (1000, 500))
# 画像を2等分する
h, w = cropped.shape[:2]
cropped_left = cropped[0:h, 0:w//2]
cropped_right = cropped[0:h, w//2:w]
# 切り出した画像を500x500にリサイズする(念のため)
cropped_left = cv2.resize(cropped_left, (500, 500))
cropped_right = cv2.resize(cropped_right, (500, 500))
return cropped_left,cropped_right
except Exception as e:
self.log_message("ImageDiff", f"プレビュー処理中にエラーが発生しました: {str(e)}")
return None,None
def highlight_differences(self, img1, img2, thresh_value_white=50):
# 閾値
thresh_value_S = 50 # 明度黒 max=255 - 50
thresh_value_V = 50 # 彩度白 max=255 - 50
thresh_width = 50 # 幅 max=1000 - 50
print("thresh_value_white : ",thresh_value_white)
# HSVに変換(一度だけ)
img1_hsv = cv2.cvtColor(img1, cv2.COLOR_BGR2HSV)
img2_hsv = cv2.cvtColor(img2, cv2.COLOR_BGR2HSV)
# マスクの作成(NumPyのベクトル化演算を使用)
mask1 = (img1_hsv[:,:,0] == 0) | (img1_hsv[:,:,0] == 180)
mask2 = (img2_hsv[:,:,0] == 0) | (img2_hsv[:,:,0] == 180)
mask_s1 = img1_hsv[:,:,1] < thresh_value_S
mask_s2 = img2_hsv[:,:,1] < thresh_value_S
mask_v1 = img1_hsv[:,:,2] < thresh_value_V
mask_v2 = img2_hsv[:,:,2] < thresh_value_V
# 色相、彩度、明度の調整を一度に行う
img1_hsv[:,:,0] = np.where(mask1 | mask_s1 | mask_v1, 0, img1_hsv[:,:,0])
img2_hsv[:,:,0] = np.where(mask2 | mask_s2 | mask_v2, 0, img2_hsv[:,:,0])
img1_hsv[:,:,1] = np.clip(img1_hsv[:,:,1], 0, 127)
img1_hsv[:,:,2] = np.clip(img1_hsv[:,:,2], 0, 127)
img2_hsv[:,:,1] = np.clip(img2_hsv[:,:,1], 0, 127)
img2_hsv[:,:,2] = np.clip(img2_hsv[:,:,2], 0, 127)
# BGRに変換
img1_processed = cv2.cvtColor(img1_hsv, cv2.COLOR_HSV2BGR)
img2_processed = cv2.cvtColor(img2_hsv, cv2.COLOR_HSV2BGR)
# 差分画像の計算(一度だけ)
diff = cv2.absdiff(img1_processed, img2_processed)
diff_gray = cv2.cvtColor(diff, cv2.COLOR_BGR2GRAY)
# 画像出力
temp_dir = self.get_temp_dir()
os.makedirs(temp_dir, exist_ok=True)
temp_path = os.path.join(temp_dir, 'diff_gray_1.png')
cv2.imwrite(temp_path, diff_gray)
# ノイズ除去と閾値処理を一度に行う
diff_gray = cv2.GaussianBlur(diff_gray, (3, 3), 0)
diff_gray = np.where(diff_gray > thresh_value_white, 255, 0).astype(np.uint8)
# 画像出力
temp_path = os.path.join(temp_dir, 'diff_gray_2.png')
cv2.imwrite(temp_path, diff_gray)
# 外周部分のマスクを作成
h, w = diff_gray.shape
mask = np.zeros_like(diff_gray)
mask[thresh_width:h-thresh_width, thresh_width:w-thresh_width] = 255
# マスクを適用
diff_gray = cv2.bitwise_and(diff_gray, mask)
# 白い部分の座標を取得
white_pixels = np.where(diff_gray > 0)
# 結果用の画像を準備(BGR形式)
result = np.zeros_like(img1)
# 白い部分の座標に対して円を描画(ベクトル化)
for y, x in zip(*white_pixels):
cv2.circle(result, (x, y), 30, (255, 255, 255), -1)
# 白い部分のマスクを作成
white_mask = (result[:, :, :3] > 250).all(axis=2)
# アルファブレンディング
result_bgra = cv2.cvtColor(result, cv2.COLOR_BGR2BGRA)
result_bgra[:, :, 3] = np.where(white_mask, 0, 127)
result_bgra[:, :, :3] = np.where(white_mask[:, :, np.newaxis], result_bgra[:, :, :3], 0)
# アルファブレンディングを実装
alpha = result_bgra[:, :, 3:4] / 255.0
final_result = (img1 * (1 - alpha) + result_bgra[:, :, :3] * alpha).astype(np.uint8)
return final_result, thresh_value_white/100
def adjust_rectangles(self, left_rectangles, right_rectangles):
try:
# グレースケール変換
left_gray = cv2.cvtColor(left_rectangles, cv2.COLOR_BGR2GRAY)
right_gray = cv2.cvtColor(right_rectangles, cv2.COLOR_BGR2GRAY)
# SIFT特徴量検出器の初期化
sift = cv2.SIFT_create()
# 特徴点と特徴量の検出
keypoints1, descriptors1 = sift.detectAndCompute(left_gray, None)
keypoints2, descriptors2 = sift.detectAndCompute(right_gray, None)
if descriptors1 is None or descriptors2 is None:
self.log_message("ImageDiff", "特徴点の検出に失敗しました")
return right_rectangles
# FLANNベースのマッチャーの設定
FLANN_INDEX_KDTREE = 1
index_params = dict(algorithm=FLANN_INDEX_KDTREE, trees=5)
search_params = dict(checks=50)
flann = cv2.FlannBasedMatcher(index_params, search_params)
# 特徴点マッチング
matches = flann.knnMatch(descriptors1, descriptors2, k=2)
# 良いマッチングの選択(Lowe's ratio test)
good_matches = []
for m, n in matches:
if m.distance < 0.7 * n.distance: # より厳密な閾値
good_matches.append(m)
if len(good_matches) < 4:
self.log_message("ImageDiff", "十分な特徴点マッチングが見つかりませんでした")
return right_rectangles
# マッチングした特徴点の座標を取得
src_pts = np.float32([keypoints1[m.queryIdx].pt for m in good_matches]).reshape(-1, 1, 2)
dst_pts = np.float32([keypoints2[m.trainIdx].pt for m in good_matches]).reshape(-1, 1, 2)
# RANSACを使用してホモグラフィ行列を計算
H, mask = cv2.findHomography(dst_pts, src_pts, cv2.RANSAC, 5.0)
if H is None:
self.log_message("ImageDiff", "ホモグラフィ行列の計算に失敗しました")
return right_rectangles
# 透視変換の適用
h, w = left_rectangles.shape[:2]
result = cv2.warpPerspective(right_rectangles, H, (w, h))
# デバッグ用:マッチング結果の可視化
matches_img = cv2.drawMatches(left_rectangles, keypoints1, right_rectangles, keypoints2, good_matches, None, flags=2)
temp_dir = self.get_temp_dir()
os.makedirs(temp_dir, exist_ok=True)
temp_path = os.path.join(temp_dir, 'matches.png')
cv2.imwrite(temp_path, matches_img)
# 差分画像の生成と表示
diff_highlighted, diff_ratio = self.highlight_differences(left_rectangles, result)
if diff_highlighted is not None:
temp_path = os.path.join(temp_dir, 'temp_diff.jpg')
cv2.imwrite(temp_path, diff_highlighted)
self.image_widget_diff.source = temp_path
self.image_widget_diff.reload()
self.log_message("ImageDiff", f"差分検出が完了しました : スコア {diff_ratio:.2%}")
return result
except Exception as e:
self.log_message("ImageDiff", f"特徴点マッチング中にエラーが発生しました: {str(e)}")
return right_rectangles
def main_process(self, image):
try:
self.log_message("ImageDiff", "メイン処理を開始します...")
if image is None:
self.log_message("ImageDiff", "画像を読み込めませんでした")
return None,None
self.left_rectangles, self.right_rectangles = self.detect_and_crop_rectangles(image)
# 切り出した画像を出力
temp_dir = self.get_temp_dir()
os.makedirs(temp_dir, exist_ok=True)
temp_path = os.path.join(temp_dir, '0_cropped_L.png')
cv2.imwrite(temp_path, self.left_rectangles)
temp_path = os.path.join(temp_dir, '0_cropped_R.png')
cv2.imwrite(temp_path, self.right_rectangles)
if self.left_rectangles is None or self.right_rectangles is None:
self.log_message("ImageDiff", "四角形検出に失敗しました")
return None,None
self.log_message("ImageDiff", "四角形検出が完了しました")
# 最適化処理を開始
self.right_rectangles = self.adjust_rectangles(self.left_rectangles, self.right_rectangles)
self.log_message("ImageDiff", f"最適化完了")
# 最終結果を表示
diff_highlighted, diff_ratio = self.highlight_differences(self.left_rectangles, self.right_rectangles)
if diff_highlighted is not None:
temp_path = os.path.join(self.get_temp_dir(), 'result.png')
cv2.imwrite(temp_path, diff_highlighted)
self.image_widget_diff.source = temp_path
self.image_widget_diff.reload()
self.log_message("ImageDiff", f"差分検出が完了しました : スコア {diff_ratio:.2%}")
self.left_img=self.left_rectangles
self.right_img=self.right_rectangles
return diff_highlighted,diff_ratio
except Exception as e:
self.log_message("ImageDiff", f"メイン処理中にエラーが発生しました: {str(e)}")
return None,None
def preview_diff(self, image):
try:
if image is None:
self.log_message("ImageDiff", "画像を読み込めませんでした")
return None,None
# 画像を切り抜き
self.left_rectangles, self.right_rectangles = self.detect_and_crop_rectangles(image)
if self.left_rectangles is None or self.right_rectangles is None:
self.log_message("ImageDiff", "四角形検出に失敗しました")
return None,None
else:
from kivy.uix.popup import Popup
from kivy.uix.label import Label
popup = Popup(title='Detection',
content=Label(text='Success!'),
size_hint=(None, None), size=(400, 200))
popup.open()
self.log_message("ImageDiff", "四角形検出が完了しました")
# 最適化開始せずに差分を表示
diff_highlighted, _ = self.highlight_differences(self.left_rectangles, self.right_rectangles)
return diff_highlighted, self.right_rectangles
except Exception as e:
self.log_message("ImageDiff", f"プレビュー処理中にエラーが発生しました: {str(e)}")
return None,None
def build(self):
# パーミッションのリクエスト
if platform == 'android':
try:
from android.permissions import request_permissions, Permission
request_permissions([Permission.CAMERA, Permission.WRITE_EXTERNAL_STORAGE])
except ImportError:
pass
# メインレイアウト
self.layout = ScrollView(
do_scroll_x=False,
do_scroll_y=True,
size_hint=(1.0, 1.0),
pos_hint={'x': 0.0, 'y': 0.0}
)
self.content_layout = FloatLayout(
size_hint=(1.0, 2.0),
pos_hint={'x': 0.0, 'y': 0.0}
)
# カメラオーバーレイレイアウト
self.camera_overlay = CameraOverlay(
size_hint=(0.8, 0.5),
pos_hint={'x': 0.0, 'y': 0.5}
)
self.camera = Camera(
resolution=(1280, 720), play=True,
size_hint=(1.0, 1.0),
pos_hint={'x': 0.0, 'y': 0.0}
)
self.camera_overlay.add_widget(self.camera)
self.content_layout.add_widget(self.camera_overlay)
# 撮影ボタン
self.capture_button = Button(
text='take photo',
size_hint=(0.2, 0.3),
pos_hint={'x': 0.8, 'y': 0.6},
on_press=self.capture
)
self.content_layout.add_widget(self.capture_button)
# 差分画像
self.image_widget_diff = Image(
size_hint=(0.35, 0.3),
pos_hint={'x': 0.0, 'y': 0.0}
)
# 右側画像
self.image_widget_right = Image(
size_hint=(0.35, 0.3),
pos_hint={'x': 0.4, 'y': 0.0}
)
# 計算ボタン
self.calc_button = Button(
text='Deep Search',
size_hint=(0.2, 0.3),
pos_hint={'x': 0.8, 'y': 0.0},
on_press=self.calc
)
self.content_layout.add_widget(self.image_widget_diff)
self.content_layout.add_widget(self.image_widget_right)
self.content_layout.add_widget(self.calc_button)
# スクロールビューにコンテンツを追加
self.layout.add_widget(self.content_layout)
return self.layout
def on_camera_size(self, instance, value):
# すでに回転設定してたら何もしない(多重回転防止)
if hasattr(self, 'rotated'):
return
self.rotated = True
# 回転を設定
with instance.canvas.before:
PushMatrix()
self.rotation = Rotate(
angle=-90,
origin=instance.center # この時点ならサイズ決まってる
)
with instance.canvas.after:
PopMatrix()
# centerもサイズ変更で追従させる(重要!)
instance.bind(pos=self.update_rotation_origin)
def update_rotation_origin(self, instance, value):
self.rotation.origin = instance.center
def capture(self, instance):
debug = False
# カメラのテクスチャを取得
texture = self.camera.texture
if texture:
# テクスチャのサイズを取得
w, h = texture.size
# テクスチャのピクセルデータを取得
pixels = texture.pixels
# NumPy配列に変換
img = np.frombuffer(pixels, np.uint8)
img = img.reshape(h, w, 4) # RGBA形式
# BGRに変換
img = cv2.cvtColor(img, cv2.COLOR_RGBA2BGR)
# 画像を回転(Androidの場合、90度回転が必要と左右反転)
if platform == 'android':
img = cv2.rotate(img, cv2.ROTATE_180)
# 画像を左右反転
img = cv2.flip(img, 1)
#capture
self.captured = img
# 一時ファイルとして保存
temp_dir = self.get_temp_dir()
os.makedirs(temp_dir, exist_ok=True)
temp_path = os.path.join(temp_dir, 'temp_captured.png')
cv2.imwrite(temp_path, self.captured)
if debug:
#temp_path = os.path.join(temp_dir, 'PXL_20250517_030606430.jpg')
temp_path = os.path.join(temp_dir, 'PXL_20250517_030552097.jpg')
self.captured = cv2.imread(temp_path)
diff_image_preview,right_rect = self.preview_diff(self.captured)
temp_path2 = os.path.join(temp_dir, 'temp_diff_preview.png')
if diff_image_preview is not None:
cv2.imwrite(temp_path2, diff_image_preview)
self.image_widget_diff.source = temp_path2
self.image_widget_diff.reload()
if right_rect is not None:
temp_path3 = os.path.join(temp_dir, 'temp_right_rect.png')
cv2.imwrite(temp_path3, right_rect)
self.image_widget_right.source = temp_path3
self.image_widget_right.reload()
def toggle_button1_press(self, instance):
if instance.state == 'down':
self.recalculate_diff(30)
def toggle_button2_press(self, instance):
if instance.state == 'down':
self.recalculate_diff(40)
def toggle_button3_press(self, instance):
if instance.state == 'down':
self.recalculate_diff(50)
def toggle_button4_press(self, instance):
if instance.state == 'down':
self.recalculate_diff(70)
def toggle_button5_press(self, instance):
if instance.state == 'down':
self.recalculate_diff(80)
def recalculate_diff(self, thresh_value):
if hasattr(self, 'captured'):
diff_highlighted, diff_ratio = self.highlight_differences(
self.left_img,
self.right_img,
thresh_value_white=thresh_value
)
if diff_highlighted is not None:
temp_path = os.path.join(self.get_temp_dir(), 'result.png')
cv2.imwrite(temp_path, diff_highlighted)
# 画像の更新処理を修正
self.large_image.source = temp_path
self.large_image.reload()
self.log_message("ImageDiff", f"差分検出が完了しました : スコア {diff_ratio:.2%}")
def calc(self, instance):
diff_highlighted,_=self.main_process(self.captured)
# 保存
temp_path = os.path.join(self.get_temp_dir(), 'result.png')
if diff_highlighted is not None:
cv2.imwrite(temp_path,diff_highlighted)
# 他のウィジェットを非表示
self.image_widget_right.opacity = 0
self.calc_button.opacity = 0
self.capture_button.opacity = 0
self.camera.opacity = 0
self.camera_overlay.opacity = 0
# スクロールビューをクリア
self.layout.clear_widgets()
# 新しいScatterウィジェットを作成
scatter = Scatter(
do_rotation=False,
do_scale=True,
do_translation=True,
scale_min=0.5,
scale_max=5.0,
size_hint=(None, None),
size=(2000, 2000),
pos_hint={'center_x': 0.5, 'center_y': 0.5}
)
# 画像ウィジェットを作成
self.large_image = Image(
source=temp_path,
size_hint=(None, None),
size=(2000, 2000),
allow_stretch=True
)
# ToggleButtonを作成
self.toggle_button1 = ToggleButton(
text='extra deep',
group='toggle_group',
on_press=self.toggle_button1_press
)
self.toggle_button2 = ToggleButton(
text='deep',
group='toggle_group',
on_press=self.toggle_button2_press
)
self.toggle_button3 = ToggleButton(
text='standard',
group='toggle_group',
on_press=self.toggle_button3_press
)
self.toggle_button4 = ToggleButton(
text='light',
group='toggle_group',
on_press=self.toggle_button4_press
)
self.toggle_button5 = ToggleButton(
text='extra light',
group='toggle_group',
on_press=self.toggle_button5_press
)
self.togglegroup = BoxLayout(
orientation='horizontal',
size_hint=(1.0, None),
size=(Window.width, 200),
pos_hint={'center_x': 0.5, 'y': 0.0}
)
self.togglegroup.add_widget(self.toggle_button1)
self.togglegroup.add_widget(self.toggle_button2)
self.togglegroup.add_widget(self.toggle_button3)
self.togglegroup.add_widget(self.toggle_button4)
self.togglegroup.add_widget(self.toggle_button5)
# Scatterに画像を追加
scatter.add_widget(self.large_image)
scatter.add_widget(self.togglegroup)
# スクロールビューにScatterを追加
self.layout.add_widget(scatter)
self.log_message("ImageDiff", "画像の更新が完了しました")
popup = Popup(title='DeepSearch',
content=Label(text='Successed'),
size_hint=(None, None), size=(400, 200))
popup.open()
else:
print("img_lib failed")
popup = Popup(title='DeepSearch',
content=Label(text='Failed'),
size_hint=(None, None), size=(400, 200))
popup.open()
if __name__ == '__main__':
CameraApp().run()
返信がありません